Chapter 1: Getting Started
- Select the Akeni Expert Server installation file that matches your operating
system and double-click on the file.
- If you are installing the commercial version of the software, or you have
received an extended evaluation license key, please make
sure that you have placed the license key file in the same directory
as the installer.
- A welcome window will appear with information pertaining to the Akeni
product, press the “Next” button to proceed.
- The license agreement will now appear. If you accept the license
agreement, select “I agree with the terms of the license” and press the
“Next” button to continue. Otherwise, press the “Cancel” button to exit the installation.
- The installer information window will now appear. Enter the applicable
information and press the “Next” button to continue.
- Enter the password for system administrator account "admin" and enter the
password again to verify the password. You will have re-install the program
if you lost your password (but your data will still be intact)
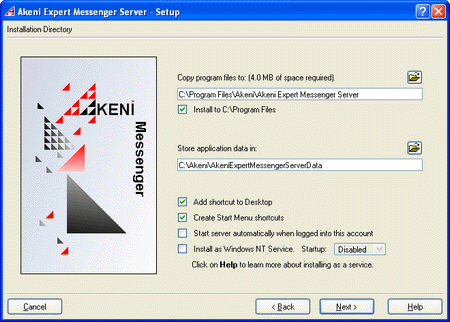
- Select the location where you wish Akeni to be installed and where the
application data should be stored. Other options include:
- Add shortcut to Desktop – This will add a shortcut icon to your desktop.
- Create Start Menu shortcuts – This will add Akeni to your
Start menu list.
- Start server automatically when logged into this account – This will automatically launch Akeni when you login to your system.
- Install as Windows NT Service – This option is available on
Windows NT/2000/XP, and it will allow the server to run in the
background when the machine is booted, without having to log
into the system. You can only install as a Service when you are
logged in as the system administrator.
Press the “Next” button to proceed.
- You're now ready to install. The preview window will list the options
that you have selected. If you wish to make changes, press the “Back”
button. Otherwise, press the “Install” button to proceed.
- Akeni Expert Server has now been installed. To complete the process,
press the “Finish” button.
- Depending on the options you selected during installation, you can start
Akeni Expert Server in the following methods:
- Double click on the “Akeni Expert Server” icon on your desktop.
OR
- Press the “Start” button on your system tray.
- Select “Programs -> Akeni Expert Messenger Server -> Akeni Expert Server”.
OR
- Press the “Start” button on your system tray.
- Select “Programs -> Akeni Expert Messenger Server -> Start
Service”.
- (You will see this option only if you installed the
server as a Windows NT Service.)

- Select the Akeni Expert Client installation file that matches your operating
system and double-click on the file.
- If you are installing the commercial version of the software, or you have
received an extended evaluation license key, please make
sure that you have placed the license key file in the same directory
as the installer.
- A welcome window will appear with information pertaining to the Akeni
product, press the “Next” button to proceed.
- The license agreement will now appear. If you accept the license
agreement, select “I agree with the terms of the license” and press the
“Next” button to continue. Otherwise, press the “Cancel” button to exit the installation.
- The installer information window will now appear. Enter the applicable
information and press the “Next” button to continue.
- Select the location where you wish Akeni to be installed and where the
application data should be stored. Other options include:
- Add shortcut to Desktop – This will add a shortcut icon to your desktop.
- Create Start Menu shortcuts – This will add Akeni to your
Start menu list.
- Run this program when Windows starts – This will automatically launch Akeni when you login to your system.
Press the “Next” button to proceed.
- You're now ready to install. The preview window will list the options
that you have selected. If you wish to make changes, press the “Back”
button. Otherwise, press the “Install” button to proceed.
- Akeni Expert Client has now been installed. To complete the process,
press the “Finish” button.
- Depending on the options you selected during installation, you can start
Akeni Expert Client in the following methods:
- Double click on the “Akeni Expert” icon on your desktop.
OR
- Press the “Start” button on your system tray.
- Select “Programs -> Akeni Expert Messenger -> Akeni Expert”.
- Enter the "admin" account password to login to server as
the Akeni Expert Server administrator:


