You can also send e-mails directly using Akeni. It will open up the composer of your default e-mail application.
Akeni offers an instant broadcasting feature that will pop up a message on the contacts you’ve chosen.
- Select the group or users to who you wish to send the notification to.
- Press the
 icon.
icon.
OR
- Select “Action -> Notification”
OR
- Right click on the group.
- Select “Notify Online Group Members”.
OR
- Right click on the selected contacts.
- Select “Notify”.
- This will pop up the “Notification Composer”.
- Enter a subject heading and the message that you want to broadcast.
.: Hint :.
If you send the same notification often you can save the template by selecting “Make notification permanent”. In the future just select it from the subject pull down. |
- Set the priority of the broadcast by pressing the
 button (located on the right top corner or your composer window).
- Press the “Send” button when you are ready to broadcast the notification.
Receiving Notifications
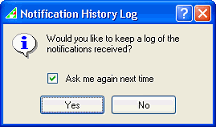
The first time you receive a notification it will ask you if you wish to log them.
If you choose not to log you can turn on the option later by selecting “History -> Log To File”.
If your notifications are being logged a check mark will appear in the “History” tab as an indicator.
To View Notifications
- Select “View -> Notification Window”
- To switch to the history view, click on the “History” tab.
OR
- Press the
 icon.
icon.
OR
- Select “History -> Goto History Tab”.
- You can sort your notifications by priority, contact, date sent and subject by clicking their respective column tabs.
- To close the notification that you were viewing, press the
 on your toolbar.
- To close the notification workspace, press the
 button on the top right corner.
If a contact isn't responding during a chat session you can send them an alert to grab their attention.
- In the chat window, click on the
 button
OR
- In the chat or conference window, select “Action -> Send Attention”.
- This will pop up the “Send Attention” composition box. Enter a short message and press the “OK” button.
- The following small message will appear on their system tray to get their attention.
When you send files using Akeni the files are automatically verified for authenticity using MD5.
However, if during a chat session you need to regenerate the MD5 signature for comparison, you can compute it in the following manner:
- In your chat window select “File -> Compute Signature”.
- The “Compute File Signature” window will appear. Use the "Browse..." button to locate your file or drag & drop the file.
- Press the “Compute” button.
- The “Signature (MD5): not computed yet” will change to show the file signature.
You can quickly get information on a particular user by placing your mouse pointer over the user. After a few seconds a box will appear with that user’s information.
To have the quick info appear in a window do the following:
- Select the user.
- Select “Action -> Quick Info”.
OR
- Right click on the user.
- Select “Quick Info”.
- This will pop up the contact information for the user
.: Side Note :.
The information that you see will depend on what the user gave you permission to access. |
To view a contact’s properties do the following:
- Select user.
- Select “Action -> Properties”.
OR
- Right click on the user.
- Select “Properties”.
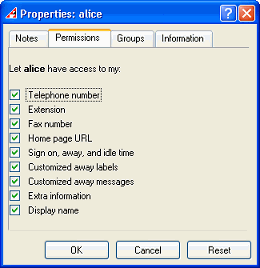
- This will pop up the properties window offering various information about the user:
- Notes Tab – Contains personal notes that you which to include about the contact.
- Permissions Tab – Shows you the information that you have allowed the contact to see.
- Groups Tab – Shows you the groups you placed the contact under.
- Information Tab – Shows you the information that the contact has made available to you (similar contact to what you would see using the “Quick Info” option).
- To close the window, press the
 button on the top right corner.


 button on the top right corner.
 button


 button on the top right corner.